Monday, January 26, 2015

Best Water Color Art Supplies I Use for Travel

Just wanted to share the art supplies I use to make my water color paintings- paints, brushes, paper. I have been making water color paintings for more than 20 years now, and have used all major brands of art supplies. I stick to using as less supplies as possible because 1. I am lazy, and 2. I want to pack light when I travel because I carry my art stuff all the time.

Here are the ones I swear by for the best effortless paintings:

Paint Supplies:
Camel Artist Water Color Tubes
These are not that expensive, but I use them for the colors I don't use enough in my paintings, like browns and greys (I like to use greens and blues more).


Green, Blue and Red Water Color Paints:
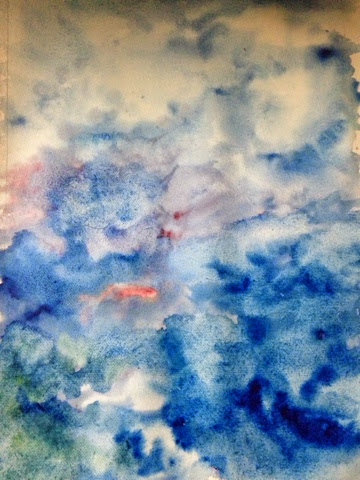
I love the Windsor and Newton's Cotman Water Color tubes. They're my favorite water color purchases till date. I have two in prussian blue 538, because I paint skies and waters so often, and one of Sap Green 599 and Alizarin Crimson Hue 003 each, I use 8ml, but here's the link I found for 21ml Cadmium Red:
Winsor & Newton Cotman 21ml Water Colour Tube - Cadmium Red Hue
They give absolutely brilliant tones that brighten up my paintings.


Brushes:
I have a mix of round, flat and fan brushes. I keep 6 brushes in my travel kit:
Blick Scholastic Wonder White Fan Brush #4 (I use this for flowers, clouds and waves)
Camlin Series 66 Round Paint Brush
Here's the link for Camlin Series 66 Round Paint Brush on Flipkart.com
Camlin #8 Round Brush (I use this for most of all my paintings)
#12 Flat Brush (I paint skies with this)
#6 Flat Brush (I use this rarely, for water waves)
#3 Round Brush (for fine details)

Paper:
I am totalllllyyyyy in love with this water color pad. I wonder why this is still uncommon. It comes with 20 sheets on 300 gsm, perfect for travel, and all medium-small sized paintings. I keep my paintings in it until I return from my travels and until I get them framed.

Best purchase ever: Fabriano Studio Water Color Pad


How to Make Stained Glass Mosaic Painting - 2

Contd. from my previous blog post "Colored Glass Mosaic Painting "

I had leftover glass pieces from the previous painting I hadn't used. They needed a painting of their own. These were mirrors, stained glass pieces in green, and colored glass pieces in blue. Here's the finished result and how I made it:

Choosing a Theme:
I wanted something inspirational. And the glass pieces were blue and green, so I chose a wishing tree. The idea behind this painting is simple- it's a wishing painting. We usually make wishes in wishing wells, or landmark bridges, or temples. But what if I had a painting in my own home that I could make wishes from, and be inspired by all the time?!

The concept was to make sort of a dual shape. It's a tree, but it's also a dancing peacock. Because essentially a peacock makes a wish by spreads its wings. It is wishing to look attractive to its prospective mates. So I thought the concept went well with my color choice and theme.

Planning the Layout:
Like the previous painting, I laid out several ideas on the floor first to choose from. 

Laying the Pieces on Glass:
After finalizing the shape, I laid out the pieces in the shape of a tree/peacock directly on the glass. This time, instead of placing them with edges parallel, I laid them out with corners touching and no parallel edges for more negative spaces in between. The pieces have an embossed floral pattern on them, so I needed to randomize them to make the floral effect as subtle as possible.
Sticking the Pieces:
Then I stuck them on the glass using the putty.
Filling the Gaps and Painting:
Then I filled the gaps with POP and colored it with acrylic metallic green and blue.

You can use a variety of metallic shades here for drama, depending on your theme. These are the ones I used- Camel Fabrica Acrylic Metallic Colors


Then I cleared the extra paint on the mirrors using my regular nailpolish remover and cotton balls.

I also painted the beak of the peacock with the blue metallic paint. Here's the finished result. 

Backdrop:
I needed to make a backdrop because there was lots of empty space behind. I also wanted to mix media in this painting, so I decided to paint a watercolor sky. 
It's sort of a cloudy rainy sky because of my peacock dancing in the rain theme. 
Next, I had to write the words "make a wish" at the top. I wanted it to have a typed out professional look. So I typed the words out in an MS word doc, trying a few different fonts and sizes.Then I printed them to see which size and font I liked the most. Then I went back to my MS doc, and made a pdf of the text, and flipped it horizontally in photoshop. Then I printed it out on a sheet of paper and laid it out behind my glass. 
Then I just easily traced them with a permanent marker on the glass. You can use a thick marker depending on your chosen font, but I needed one with a thin tip for the serifs of my font. This is the one I used - Camlin Permanent Marker in Black.

Framing:
That's mostly it. Then I got it framed with a matching blue frame with it's sky backdrop. Looks beautiful in my living room. 

Thursday, January 22, 2015

How to Make Stained Glass Mosaic Painting

Recently I came across a local glass mosaic artist who creates artwork for Indian temples. I watched him work, cut colored glass into tiny triangles and paste onto MDF using putty. I was very fascinated with the possibilities and got some pieces cut for myself. 

The theme I chose was shattering- glass. The glasses I used are:
- Red Saint Gobain Colored Glass
- Mirror

I lay them on the floor in different permutations to see their effect. 


Then I chose this pattern of red glass against mirror and extended it. 

I put pieces together like a jigsaw puzzle, matching ends but leaving 4 mm space between each for grout. I tried many different variations. When I was satisfied with the final design, I measured the area and bought a glass of that size. Then I stuck these pieces in similar fashion to the glass using putty. 


Then I made a paste of plaster of Paris and filled within the gaps.  

I colored it black using Camel Black Fabrica paint and a thin round brush. Then I cut off the extras of POP using a paper cutter. 
This was the most time consuming part, because removing the extra POP often resulted in removal of paint from the gaps, which I then had to refill using more fabric paint or permanent marker. I used a Camlin Permanent Marker in Black for this.


I also used acetone to remove the extra paint leftover on the glass pieces. And then I framed it. Love the way it reflects the crystal chandelier in the living room.